> ## Documentation Index
> Fetch the complete documentation index at: https://docs.aegister.com/llms.txt
> Use this file to discover all available pages before exploring further.
# How to Activate (Parallel Installation)
> Step-by-step guide to activate Aegister Threat Blocker and connect it to your security infrastructure.
This guide covers the full procedure to connect and activate **Aegister Threat Blocker (ATB)**, whether you deploy it in series or in parallel. Follow these steps to integrate the device with your security infrastructure.
## 1. Corporate Account Creation
* **Preliminary:**\
First, create an account for your organization on the **Aegister Cyber Console**. You need it to manage and monitor the ATB device.
**Note:** For devices that Aegister pre-configures for Partners, the organization already exists. Register on the platform [here](https://app.aegister.com/keycloak/realms/aegister/protocol/openid-connect/auth?response_type=code\&scope=openid+email\&client_id=webapp\&redirect_uri=http%3A%2F%2Fapp.aegister.com%2Foidc%2Fcallback%2F\&state=2im9Pol7ebxPo8NiOIOTe1BCEEIIUanY\&nonce=aGU8lHJY54kTamcYrfg6Ar9tBgX3S9EN) with a corporate account, using email and password or SSO. Once registered, ask your Aegister contact for the permissions you need to access the ATB dashboard.
***
## 2. Physical Connection of the Device
* **Network connection:**\
Connect the ATB device to your firewall using any available Ethernet port (**LAN1-4**).
* **Connection confirmation:**\
Once you connect the device, our team receives a notification and begins the final remote configuration.
***
## 3. Technical Checks and Initial Configuration (by Aegister)
* **ATB to Cyber Console connection check:**\
The Aegister team verifies that the ATB communicates with the Cyber Console.
* **Aegister VPN functionality test:**\
The team confirms that the built-in VPN tunnel works, so remote maintenance and updates are possible.
* **ATB local IP verification:**\
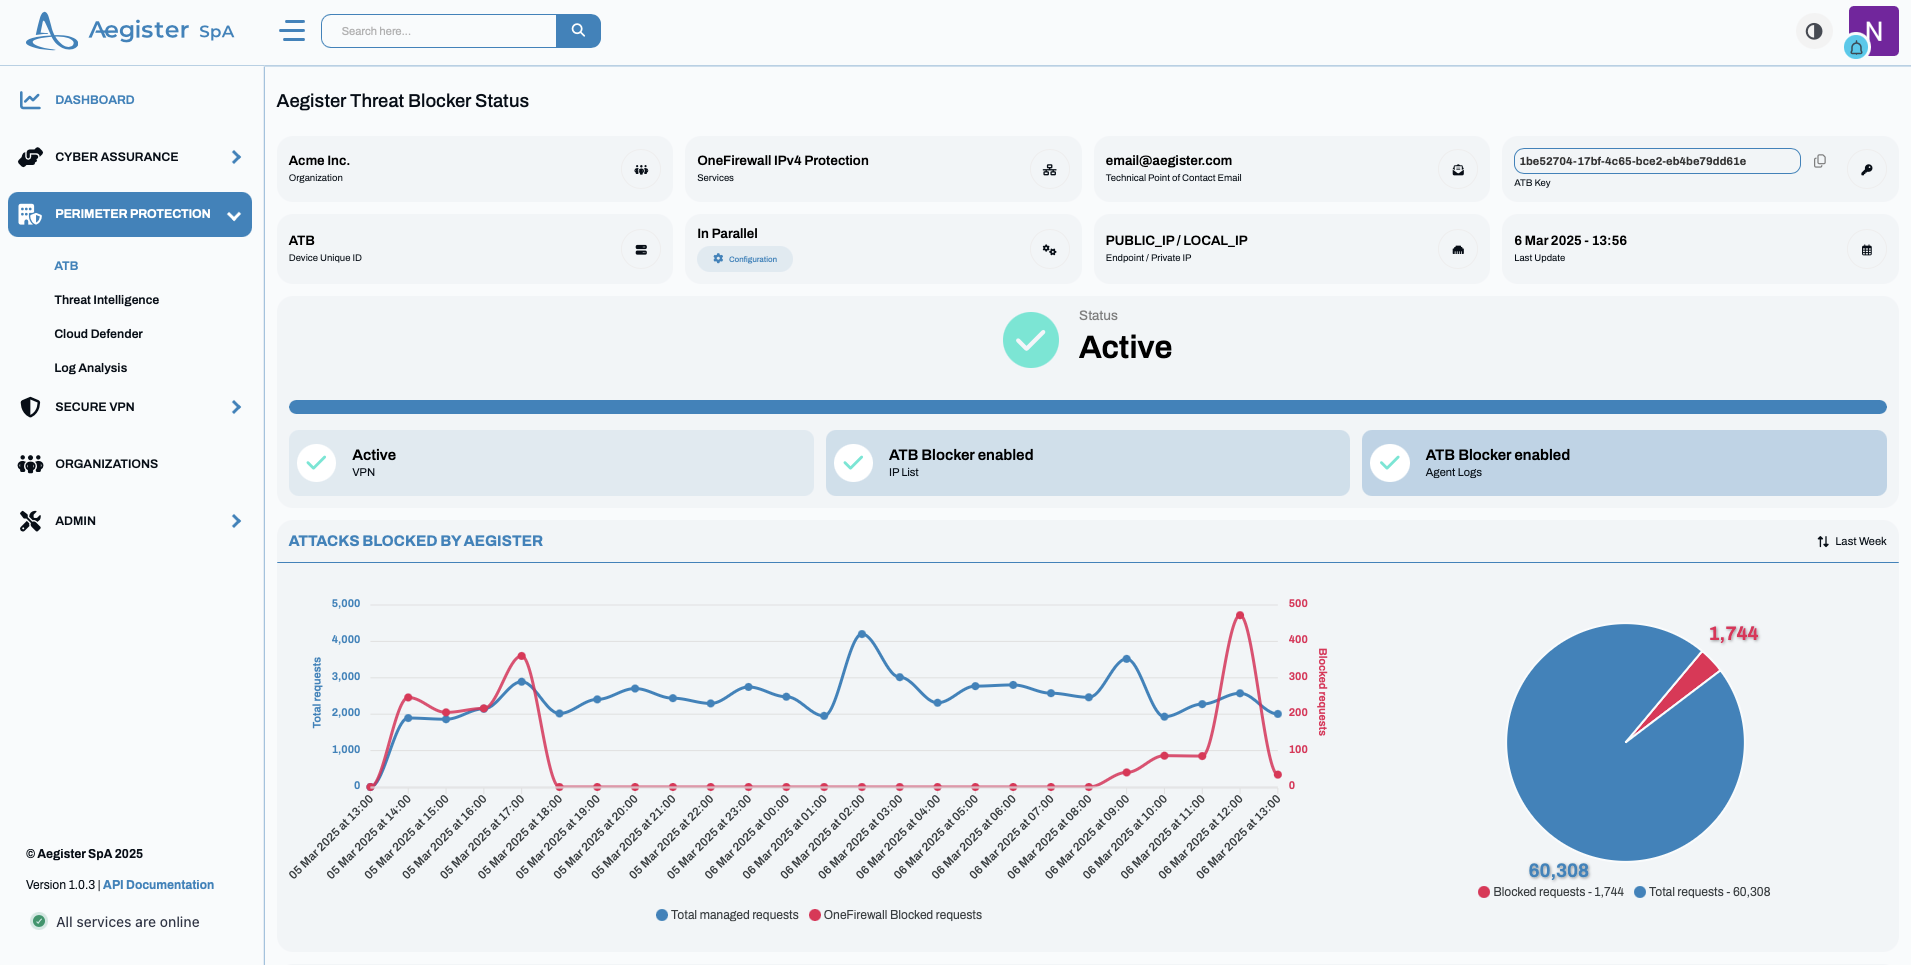
Open the [ATB](https://app.aegister.com/perimeter-protection/aegister-threat-blocker/) section of your [Aegister Cyber Console](/documentation/en/acc/how-get-account) to confirm the ATB is connected and to view its **PUBLIC\_IP** and **LOCAL\_IP**.\\
 * **Verification call:**\
If a problem arises, schedule a call with one of our experts to check the device and its connection with [app.aegister.com](https://app.aegister.com/perimeter-protection/aegister-threat-blocker//).
***
## 4. Final Steps for Parallel Connection (Generic Firewall)
Follow these steps:
1. **Access the firewall management interface:**\
Log in to your firewall's management interface through its IP address or hostname, using your administrator credentials.
2. **Connectivity check:**
* Confirm the ATB device is connected to the network and reachable.
* The IP feed is available at:
```
http://IP_ATB_LOCALE:8080/blacklist.txt
```
Open this URL to confirm the IP blacklist downloads correctly.
3. **Security rules configuration:**
* Create or change firewall rules to block traffic to or from the IPs in the blacklist.
* You need at least two rules: one for inbound traffic and one for outbound, with the action set to "Deny" or "Block".
* **Share the rule names with the Aegister team.**
4. **Advanced settings and connection security:**
* If your firewall supports automatic blacklist updates, configure periodic refreshes.
* For an HTTPS connection, provide a valid certificate to install on the ATB device, or ask us to install a self-signed certificate.
5. **Logging and monitoring configuration:**
* Enable logging to monitor events tied to your firewall rules.
* Configure log mirroring on UDP port **514**, as your firewall supports, to block unwanted traffic.
6. **Final verification and functionality test:**
* Download the blacklist again to confirm it is current and that a green check mark (or equivalent) appears.
* Run connectivity tests to confirm the blocking rules are active.
7. **Documentation and support:**
* If you hit a problem, contact our support team.
***
## 4.b Final Steps for Parallel Connection (Firewall: Fortigate)
To connect ATB in parallel to an existing Fortigate firewall, follow these steps:
1. **Access the Fortigate management interface:**\
Log in to your Fortigate firewall's control panel.
2. **Create the Security Fabric object:**
* Create a Security Fabric object named **"Aegister\_Blacklist"**.
* Use the link:
```
https://IP_LOCALE_ATB/blacklist.txt
```
Confirm the status shows "green" and the list downloads correctly.
3. **Firewall policy rules configuration:**
* **Rule 1:**
* **From:** Any
* **To:** Aegister\_Blacklist
* Assign a high rule ID and set the action to **Deny**.
* **Rule 2:**
* **From:** Aegister\_Blacklist
* **To:** Any
* Also configure this rule in Deny mode with a high rule ID.
4. **Enable logging:**\
Turn on logging on UDP port **514** to monitor events tied to these rules.
5. **Note for Fortigate:**\
Install a certificate on the ATB device, because Fortigate accepts only **HTTPS** connections for Security Fabric objects. Also specify the full filename `blacklist.txt` instead of the default `/blacklist`.
***
## 4.c Final Steps for Parallel Connection (Firewall: SonicWall)
If your environment uses a SonicWall firewall, follow these steps from the [manufacturer's guide](https://www.sonicwall.com/support/knowledge-base/how-to-configure-botnet-filtering-with-firewall-access-rules/170503936467975):
1. **Access the SonicWall management interface**\
Log in to your SonicWall firewall's control panel.
2. **Go to the Botnet Filtering section**\
Open the Botnet Filtering and Firewall Access Rules section. For more detail, see the official guide: [How to Configure Botnet Filtering with Firewall Access Rules](https://www.sonicwall.com/support/knowledge-base/how-to-configure-botnet-filtering-with-firewall-access-rules/170503936467975).
3. **Configure the Botnet Filter URL**\
Set the Botnet Filter URL to:
```
http://:8080/blacklist.txt
```
Replace `` with the local IP address from your firewall or from the [Aegister Cyber Console (ATB)](https://app.aegister.com/perimeter-protection/aegister-threat-blocker/).
> **Note:** Once you apply the rules, tell the Aegister team the firewall rule names you used.
4. **Set the object limit (Aegister team)**\
In the Cyber Console under the ATB section, click **Configuration** and set the `maximum_rules` field to:
```json theme={null}
"maximum_rules": 1999
```
5. **Verify the configuration**\
Confirm the botnet filter downloads the IPs and shows a green check mark ✅, which means the blacklist is current.
6. **Enable log mirroring and traffic monitoring**\
Configure traffic mirroring from WAN to LAN to ``:514 (UDP) on the ATB device. The device sends raw logs to [the Aegister Cyber Console](https://app.aegister.com) automatically.
If logs do not appear, the Aegister team investigates and corrects any parsing issues.
For more on Packet Mirroring on SonicWall devices, see the [SonicOS documentation](https://www.sonicwall.com/support/knowledge-base/configuring-packet-mirroring/170504587646444).
**Optional:** Log mirroring is optional and you can enable it at your discretion. It sends Syslog traffic from the firewall to the Aegister dashboard, which stores the last 10 million events and provides real-time visual and tabular traffic analytics. These logs cover both inbound and outbound IPs that our Threat Intelligence system blocked.
## Multi-Firewall Deployment
When you deploy multiple firewalls, all of them can point to the same ATB for botnet filtering. For log mirroring, each firewall must send logs to a different UDP port on the ATB.
Example configuration for three firewalls:
* Firewall 1 → UDP/514
* Firewall 2 → UDP/515
* Firewall 3 → UDP/516
Give each firewall its own UDP port to keep log streams separate for accurate monitoring and troubleshooting.
* **Verification call:**\
If a problem arises, schedule a call with one of our experts to check the device and its connection with [app.aegister.com](https://app.aegister.com/perimeter-protection/aegister-threat-blocker//).
***
## 4. Final Steps for Parallel Connection (Generic Firewall)
Follow these steps:
1. **Access the firewall management interface:**\
Log in to your firewall's management interface through its IP address or hostname, using your administrator credentials.
2. **Connectivity check:**
* Confirm the ATB device is connected to the network and reachable.
* The IP feed is available at:
```
http://IP_ATB_LOCALE:8080/blacklist.txt
```
Open this URL to confirm the IP blacklist downloads correctly.
3. **Security rules configuration:**
* Create or change firewall rules to block traffic to or from the IPs in the blacklist.
* You need at least two rules: one for inbound traffic and one for outbound, with the action set to "Deny" or "Block".
* **Share the rule names with the Aegister team.**
4. **Advanced settings and connection security:**
* If your firewall supports automatic blacklist updates, configure periodic refreshes.
* For an HTTPS connection, provide a valid certificate to install on the ATB device, or ask us to install a self-signed certificate.
5. **Logging and monitoring configuration:**
* Enable logging to monitor events tied to your firewall rules.
* Configure log mirroring on UDP port **514**, as your firewall supports, to block unwanted traffic.
6. **Final verification and functionality test:**
* Download the blacklist again to confirm it is current and that a green check mark (or equivalent) appears.
* Run connectivity tests to confirm the blocking rules are active.
7. **Documentation and support:**
* If you hit a problem, contact our support team.
***
## 4.b Final Steps for Parallel Connection (Firewall: Fortigate)
To connect ATB in parallel to an existing Fortigate firewall, follow these steps:
1. **Access the Fortigate management interface:**\
Log in to your Fortigate firewall's control panel.
2. **Create the Security Fabric object:**
* Create a Security Fabric object named **"Aegister\_Blacklist"**.
* Use the link:
```
https://IP_LOCALE_ATB/blacklist.txt
```
Confirm the status shows "green" and the list downloads correctly.
3. **Firewall policy rules configuration:**
* **Rule 1:**
* **From:** Any
* **To:** Aegister\_Blacklist
* Assign a high rule ID and set the action to **Deny**.
* **Rule 2:**
* **From:** Aegister\_Blacklist
* **To:** Any
* Also configure this rule in Deny mode with a high rule ID.
4. **Enable logging:**\
Turn on logging on UDP port **514** to monitor events tied to these rules.
5. **Note for Fortigate:**\
Install a certificate on the ATB device, because Fortigate accepts only **HTTPS** connections for Security Fabric objects. Also specify the full filename `blacklist.txt` instead of the default `/blacklist`.
***
## 4.c Final Steps for Parallel Connection (Firewall: SonicWall)
If your environment uses a SonicWall firewall, follow these steps from the [manufacturer's guide](https://www.sonicwall.com/support/knowledge-base/how-to-configure-botnet-filtering-with-firewall-access-rules/170503936467975):
1. **Access the SonicWall management interface**\
Log in to your SonicWall firewall's control panel.
2. **Go to the Botnet Filtering section**\
Open the Botnet Filtering and Firewall Access Rules section. For more detail, see the official guide: [How to Configure Botnet Filtering with Firewall Access Rules](https://www.sonicwall.com/support/knowledge-base/how-to-configure-botnet-filtering-with-firewall-access-rules/170503936467975).
3. **Configure the Botnet Filter URL**\
Set the Botnet Filter URL to:
```
http://:8080/blacklist.txt
```
Replace `` with the local IP address from your firewall or from the [Aegister Cyber Console (ATB)](https://app.aegister.com/perimeter-protection/aegister-threat-blocker/).
> **Note:** Once you apply the rules, tell the Aegister team the firewall rule names you used.
4. **Set the object limit (Aegister team)**\
In the Cyber Console under the ATB section, click **Configuration** and set the `maximum_rules` field to:
```json theme={null}
"maximum_rules": 1999
```
5. **Verify the configuration**\
Confirm the botnet filter downloads the IPs and shows a green check mark ✅, which means the blacklist is current.
6. **Enable log mirroring and traffic monitoring**\
Configure traffic mirroring from WAN to LAN to ``:514 (UDP) on the ATB device. The device sends raw logs to [the Aegister Cyber Console](https://app.aegister.com) automatically.
If logs do not appear, the Aegister team investigates and corrects any parsing issues.
For more on Packet Mirroring on SonicWall devices, see the [SonicOS documentation](https://www.sonicwall.com/support/knowledge-base/configuring-packet-mirroring/170504587646444).
**Optional:** Log mirroring is optional and you can enable it at your discretion. It sends Syslog traffic from the firewall to the Aegister dashboard, which stores the last 10 million events and provides real-time visual and tabular traffic analytics. These logs cover both inbound and outbound IPs that our Threat Intelligence system blocked.
## Multi-Firewall Deployment
When you deploy multiple firewalls, all of them can point to the same ATB for botnet filtering. For log mirroring, each firewall must send logs to a different UDP port on the ATB.
Example configuration for three firewalls:
* Firewall 1 → UDP/514
* Firewall 2 → UDP/515
* Firewall 3 → UDP/516
Give each firewall its own UDP port to keep log streams separate for accurate monitoring and troubleshooting.